Settler Job Assignment
Every settler in Going Medieval carries a Work tab. The numbers you type into that tab — from 1 to 9 — decide what they do all day. Get the priorities wrong and your colony starves with full granaries; get them right and the same settlers, doing the same jobs, keep the place alive through winter. This guide walks through how the priority queue actually reads, how skills and passion stars bend it, and how to build a roster that survives each season.
How the Work Tab Reads
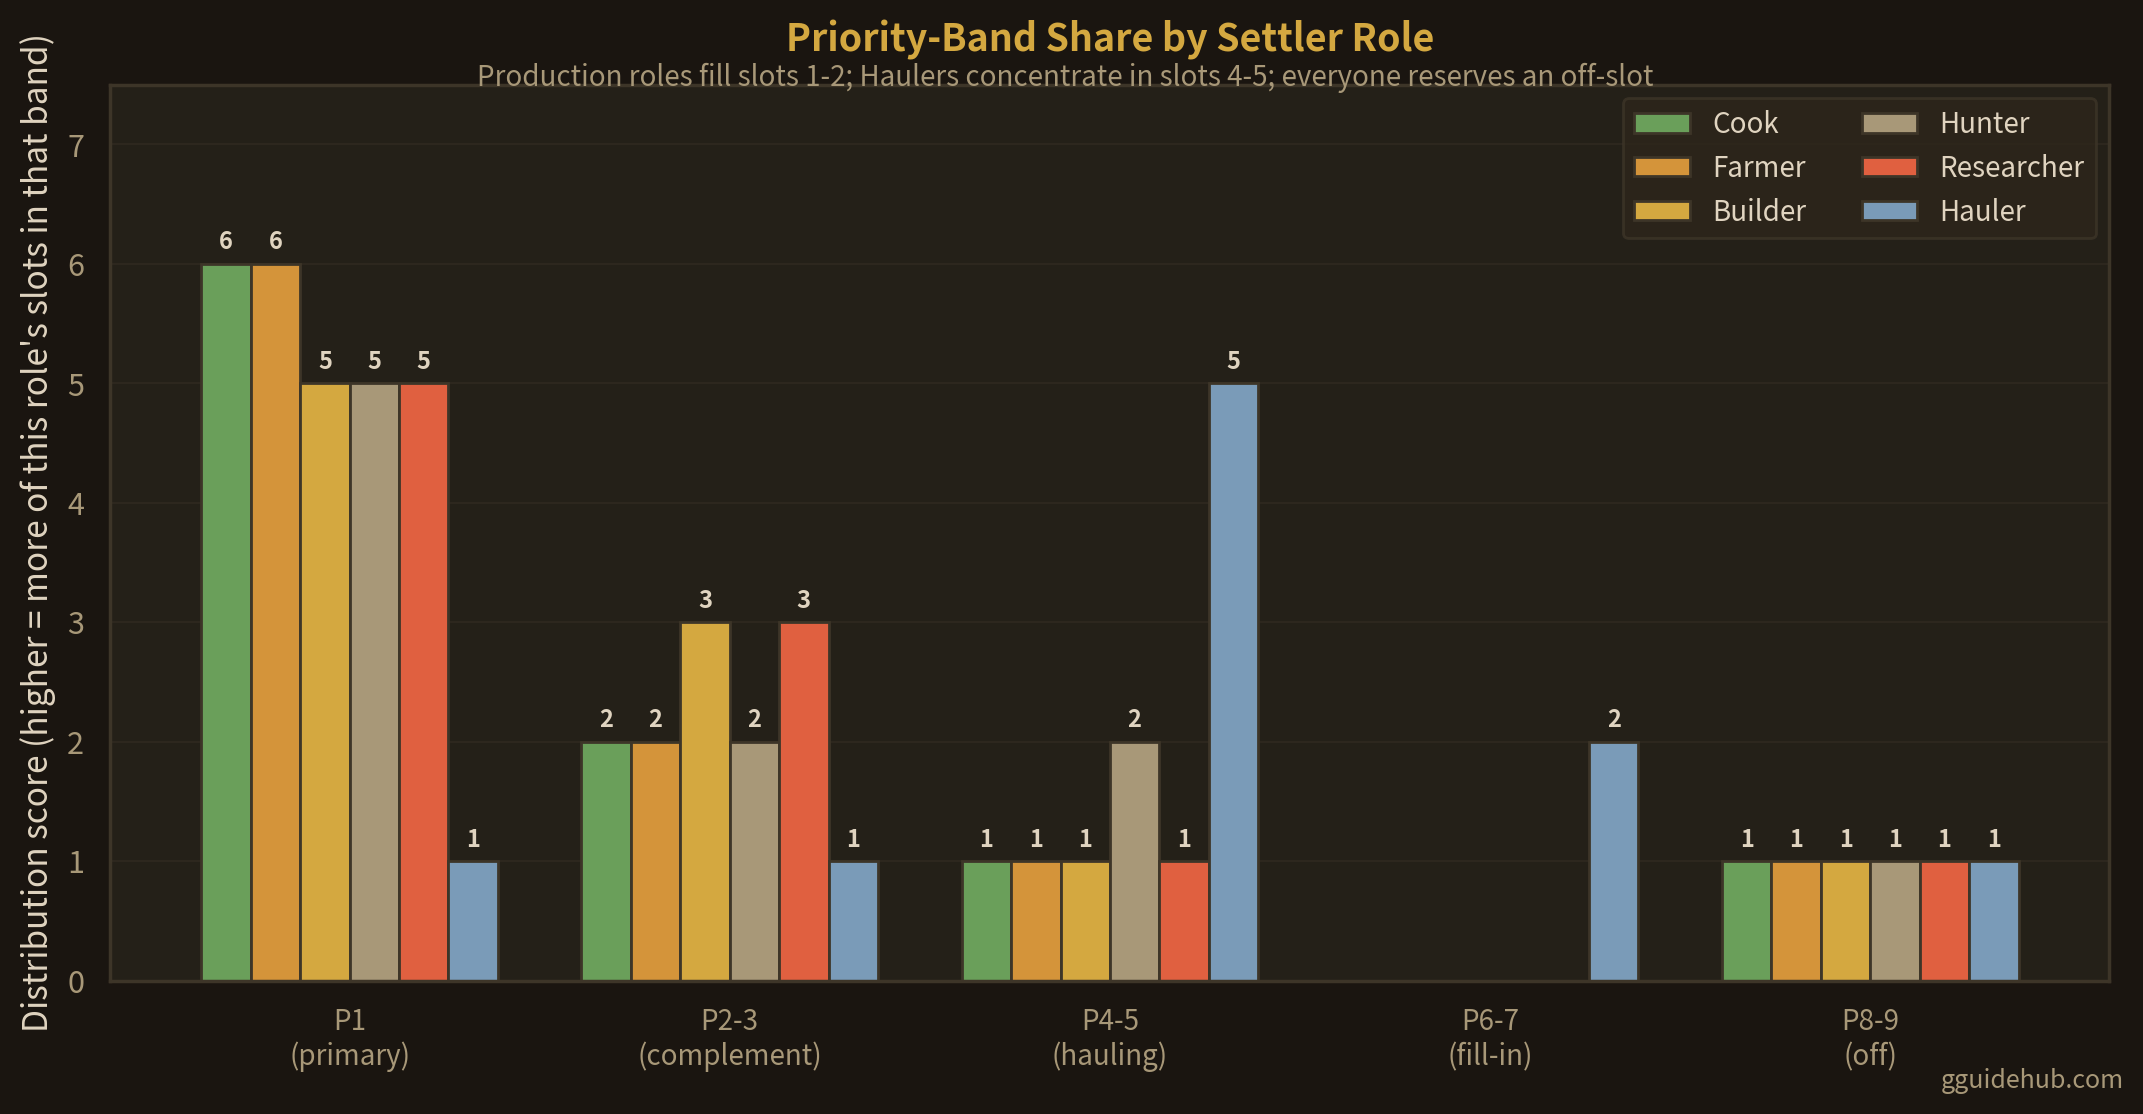
The Work tab lists every job your settler can perform. Beside each job sits a single number you can set. When a settler finishes one task, the AI scans their list top-down: the lowest number that has any eligible task gets picked next. Two consequences follow from this design.
First, priorities are per-settler. A global "1" on Cook for one settler and a "5" on Cook for another is exactly what it says — the first will cook at every opportunity, the second only when they have nothing better to do. Second, an empty or disabled slot is respected: leaving a job out of the list is the same as setting it to 9.
The result is that you build the colony one settler at a time. There is no central job manager that says "today, everyone farms" — every priority change is a small bet on what an individual colonist should be doing.
Priority Bands and What They Mean
| Priority | Meaning | Recommended slot |
|---|---|---|
| 1 | Highest — task always picked when eligible | Primary craft / production job |
| 2-3 | High — strong secondaries tied to the same work zone | Complementary jobs (e.g. Hauling + Cooking) |
| 4-5 | Medium — fill-in work, idle-time tasks | Hauling, Cleaning, Plant Cutting |
| 6-7 | Low — only when no higher-priority work exists | Optional jobs (Recreation, Tending idle beds) |
| 8-9 | Disabled / off — settler will never take this task | Jobs you want to suspend this colonist from |
A useful working pattern: pick one production job per settler at priority 1, one or two complementaries at 2-3, then set Hauling to 4 for everyone who is not your pure haulers. Researchers and healers usually run with their craft at 1 and Hauling at 4 — a 2 or 3 in this slot pulls them away from the bench or bed.
Job Categories and Skill Pairings
| Settler role | Primary job (P1) | Complementary jobs | Best-fit skill | Head-count @ 8 pop |
|---|---|---|---|---|
| Cook | Cooking | Hauling, Plant Cutting | Culinary | 1 |
| Farmer | Growing, Harvesting | Sowing, Hauling, Plant Cutting | Botany | 2 |
| Builder | Construction | Repairing, Hauling | Construction | 1-2 |
| Miner | Mining | Hauling, Construction | Mining | 1 |
| Crafter | Smithing, Tailoring | Hauling, Repairing | Crafting | 1 |
| Hunter | Hunting | Hauling, Animal Taming | Marksman | 1 |
| Healer | Doctoring, Tending | Hauling | Medical | 1 |
| Hauler | Hauling | Cleaning, Plant Cutting | Any | 1-2 |
| Researcher | Researching | Hauling | Intellectual | 1 |
Pairing matters more than headcount. A cook with Culinary passion and Botany skill at 1 will out-produce a settler with the inverse setup, and a builder who also Hauls Construction debris will keep the site cleaner than two specialists who keep crossing paths.
Skills and Passion Stars
Each settler starts with a skill score in every job and a passion indicator — flame icons beside the job on the Work tab. Passions come in three flavours, commonly labelled burning (two flames), normal (one flame), and none. A burning passion gives a substantial speed and XP bonus, a normal passion a smaller bonus, and none means the settler gains skill at the base rate.
The trap is reading skill as a hard cap. It is not. A settler without a passion but with a high skill will still beat a passionate novice, but the gap closes as the passionate one trains. Use the first season to read each colonist's flame icons and queue them into roles that lean on those flames — that is how you build a roster that levels itself while it works.
Seasonal Rotation
Spring & autumn windows
Bump Growing, Sowing and Harvesting to 1 for every settler except the cook and the researcher. Get seeds in the ground within a few in-game days, then return everyone to their regular slots.
Summer
Return to baseline priorities. Construction, Smithing and Researching stay productive while crops grow. Hauling at 4 keeps the colony tidy without pulling specialists off their benches.
Winter
Push Construction, Smithing, Tailoring and Researching to 1 for the relevant specialists. Drop Farming to 4-5 — colonists still haul and clear snow but do not waste warmth walking to distant fields.
Raids & emergencies
Combat-capable settlers shift to Defending at 1. Doctoring and Tending are emergency jobs — most settlers will respond to a downed colonist regardless of the number in their slot.
FAQ
How do settler priorities actually work in Going Medieval?
Each settler has a Work tab with one slot per job type. You set a number from 1 to 9. Priority 1 is picked first; 9 means the settler will not take that work. With nothing higher available, the settler drops to the next lowest number on their own tab. The queue is read per settler, not globally.
Should I assign many jobs or few jobs per settler?
Few jobs, well-chosen. A settler set to Cooking at 1 and Hauling at 4 stays mostly at the kitchen and only hauls in slack moments. A settler set to Cooking, Hunting, Smithing, Mining and Researching at mixed numbers will walk between far zones and finish little. Two or three complementary jobs per settler is the realistic cap.
How do skill and passion stars change the picture?
Each job a settler performs levels the linked skill. A settler with the right passion (the flame icons next to the job on the Work tab) works that job faster, and gains XP faster, than a settler with no passion. Early on, it is stronger to lean on passion than on raw skill numbers — you can train skill, but you cannot change a passion.
Do disabled jobs (priority 9) matter at all?
Yes. Priority 9 is the off-switch on the Work tab. Use it to keep a wounded settler out of combat or to keep a noble from Cleaning. Be aware that no settler set to a job is still allowed to react to emergencies (Doctoring for downed colonists, Firefighting for active fires) regardless of the priority you set.
How should I rotate jobs across seasons?
Spring and autumn are the planting and harvest windows — temporarily bump Growing, Sowing and Harvesting to priority 1 for your non-cook settlers, then drop them back. Winter shifts the colony indoors: bump Construction, Smithing, Tailoring and Researching up, and lower Farming to a maintenance number so colonists still haul snow but do not freeze outside.
Related Guides
Last updated: July 22, 2026